How to install Windows 11 on unsupported hardware

UPDATED 4/12/2023: If you have a computer with unsupported hardware, you may upgrade to Windows 11, but not through Windows Update. Instead, you must use a bootable USB flash drive or ISO file to perform a clean install or in-place upgrade manually.
Microsoft left the loophole open but didn’t mention it anywhere in the documentation, nor is it supported. According to the company, installing Windows 11 on unsupported hardware is an option for organizations. However, anyone could upgrade at their own risk knowing there is no system stability and driver compatibility guarantee.
In other words, you can continue with the setup manually if you choose to install Windows 11 on incompatible hardware. However, you must confirm that the upgrade will have an “unsupported state.” Microsoft defines an “unsupported state” as a computer that doesn’t meet the minimum system requirements. As a result, it won’t be entitled to receive updates from Windows Update. Although these devices may continue to receive updates anyway, the company isn’t obligated to provide security and driver updates or technical support.
This guide will teach you how to install Windows 11 (version 22H2) on a computer with incompatible hardware. Since the device does not officially support the new version of Windows, using this workaround is not recommended unless you know the risks and understand that stability, compatibility, and updates are not guaranteed.
Install Windows 11 on unsupported hardware from USB
Using the ISO file to perform a clean installation, you will need to create a bootable media using a third-party tool like Rufus or Command Prompt to start the setup process with a USB flash drive.
In addition, you also have to make sure the device can start from USB, which means you will have to change the UEFI settings. Since most computers have different settings, check your manufacturer support website for more specific details.
To install Windows 11 on an unsupported PC, use these steps:
-
Start the unsupported PC with the Windows 11 USB flash drive.
-
Press any key to continue.
-
Use the “Shift + F10” keyboard shortcut to open Command Prompt.
-
Type the following command and press Enter:
regedit

-
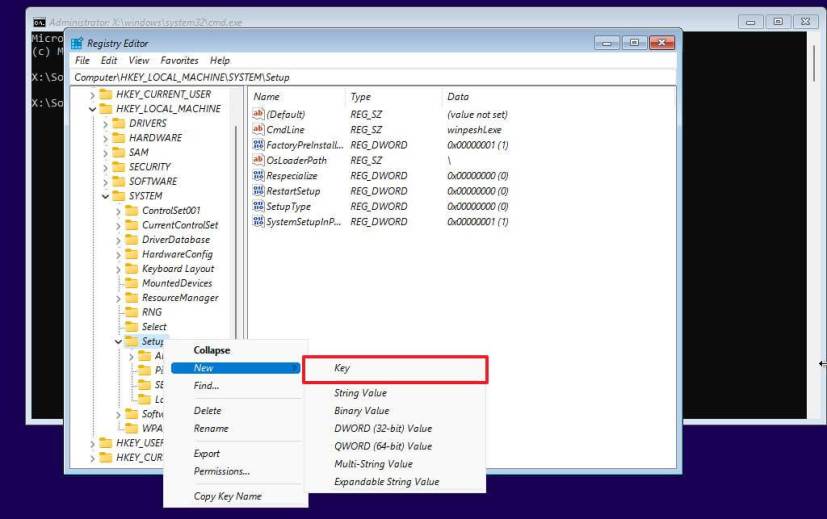
Navigate the following path:
HKEY_LOCAL_MACHINE\SYSTEM\Setup
-
Right-click the Setup (folder) key, select New, and then the Key option.
-
Name the key LabConfig and press Enter.
-
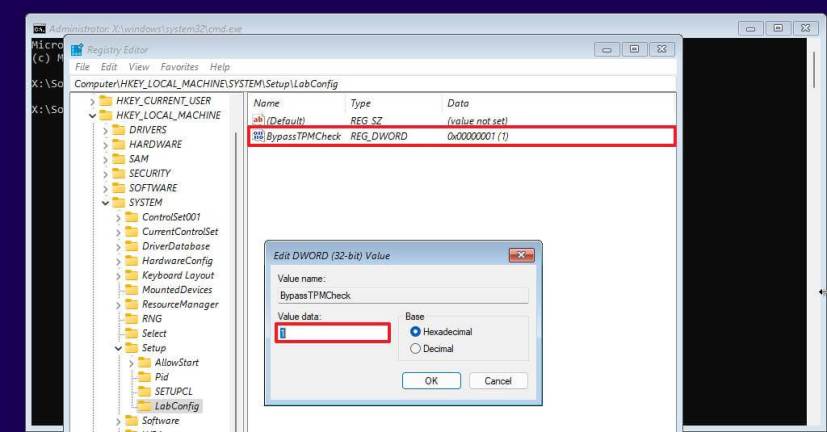
Right-click the LabConfig (folder) key, select New, and then the DWORD (32-bit) Value option.
-
Name the key BypassTPMCheck and press Enter.
-
Double-click the newly created key and set its value from 0 to 1.
-
Click the OK button.
-
Right-click the LabConfig (folder) key, select New, and then the DWORD (32-bit) Value option.
-
Name the DWORD BypassSecureBootCheck and press Enter.
-
Double-click the newly created key and set its value from 0 to 1.

-
Click the OK button.
-
Click the Next button.

-
Click the Install now button.

-
Click the “I don’t have a product key” option if you are reinstalling. If Windows 11 has been previously activated after the installation, reactivation will happen automatically.

-
Select the edition of “Windows 11” that your license key activates (if applicable).
-
Check the “I accept the license terms” option.
-
Click the Next button.
-
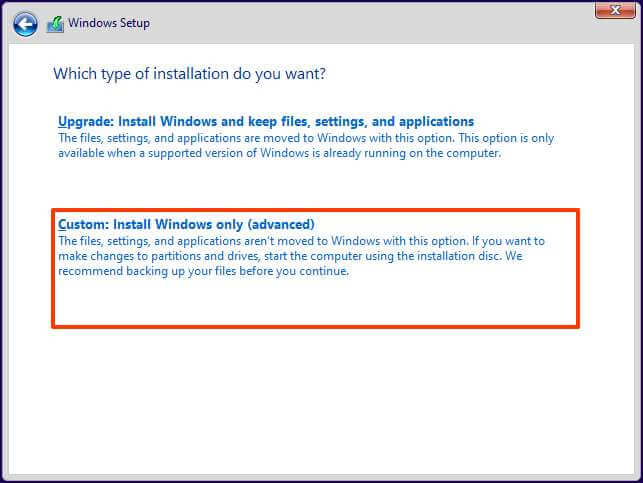
Select the “Custom: Install Windows only (advanced)” option.
-
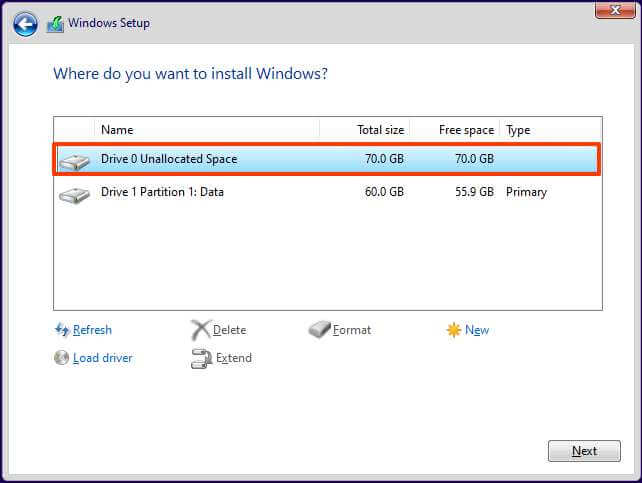
Select each partition in the hard drive you want to install Windows 11 and click the Delete button. (Typically, the “Drive 0” is the drive that contains all the installation files.)
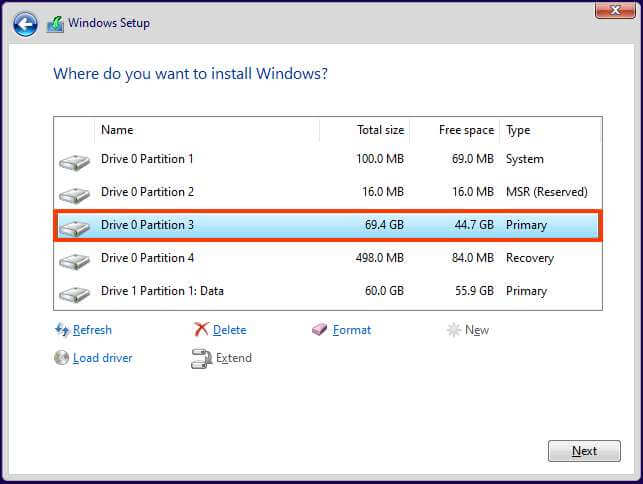
Warning: Deleting a partition also deletes all data on the drive. Also, it is not required to delete the partitions from a secondary hard drive.
-
Select the hard drive (“Drive 0 Unallocated Space”) to install Windows 11 on an unsupported device.
-
Click the Next button.
-
Select your region setting after the installation on the first page of the out-of-the-box experience (OOBE).

-
Click the Yes button.
-
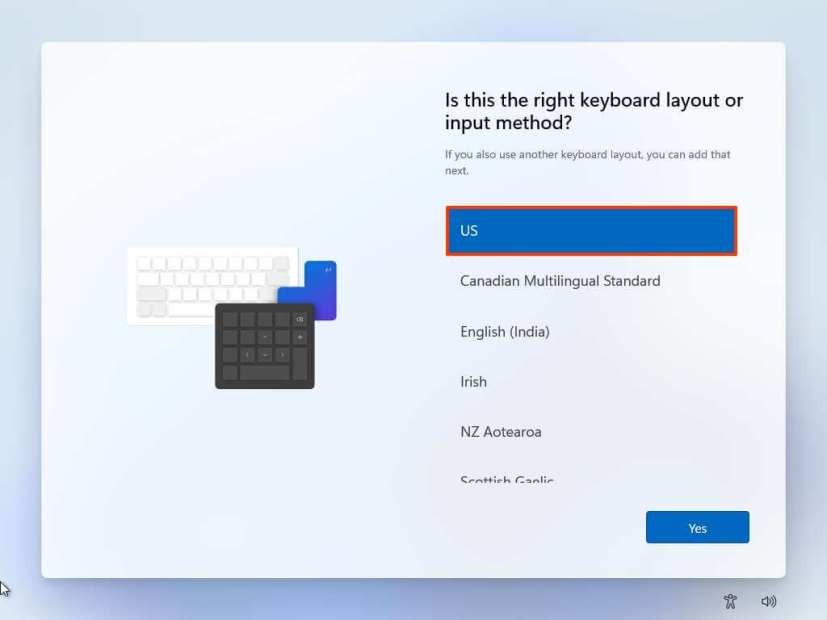
Select your keyboard layout setting.
-
Click the Yes button.
-
Click the Skip button if you do not need to configure a second layout.
-
The computer will automatically connect to the network if it uses an Ethernet connection. If you have a wireless connection, you must set up the connection manually (a security key may be required).
-
(Optional) Confirm a name for the computer.

-
Click the Next button. (The device will restart automatically.)
-
Select the “Set up for personal use” option if you are configuring Windows 11 Pro. The “Home” edition does not have this option.

-
Click the Next button.
-
Click the Sign in button.

-
Confirm your Microsoft account email, phone number, or Skype identification to create an account.

-
Click the Next button.
-
Confirm your Microsoft account password.
-
Click the Next button.
-
Click on “View more options.”

-
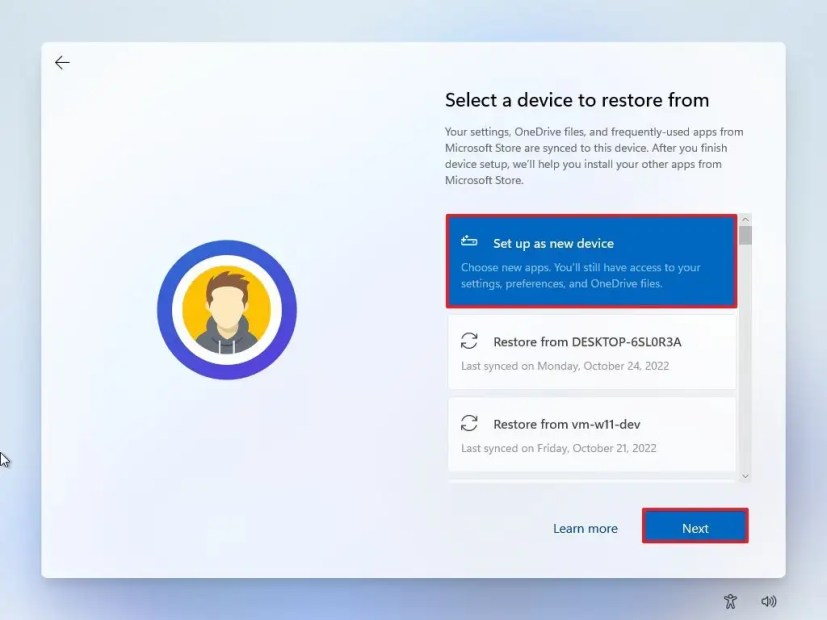
Choose the “Set up a new device” option.
-
Click the Next button.
-
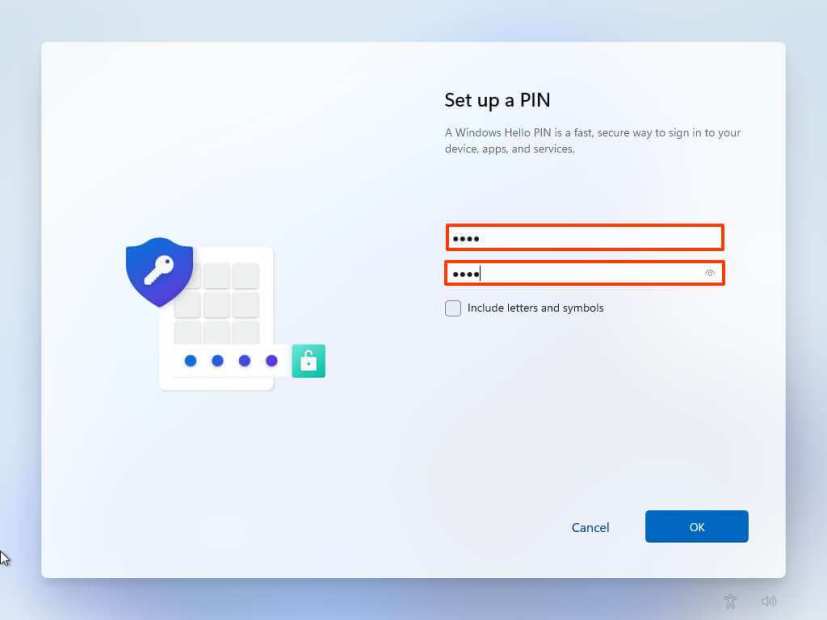
Click the Create PIN button.

-
Create a new four-digit PIN.
-
Click the OK button.
-
Confirm the privacy settings best suit your situation by turning on or off the toggle switch for each setting.

-
Click the Next button.
-
Click the Next button again.
-
Click the Accept button.

-
(Optional) On the “Let’s customize your experience” page, select one or more ways you plan to use the device to allow the setup to suggest tools and service customizations during this experience.

-
Click the Accept button to continue. Or click the Skip button to skip this part of the setup.
-
Click the Skip button for the Android phone link process.
-
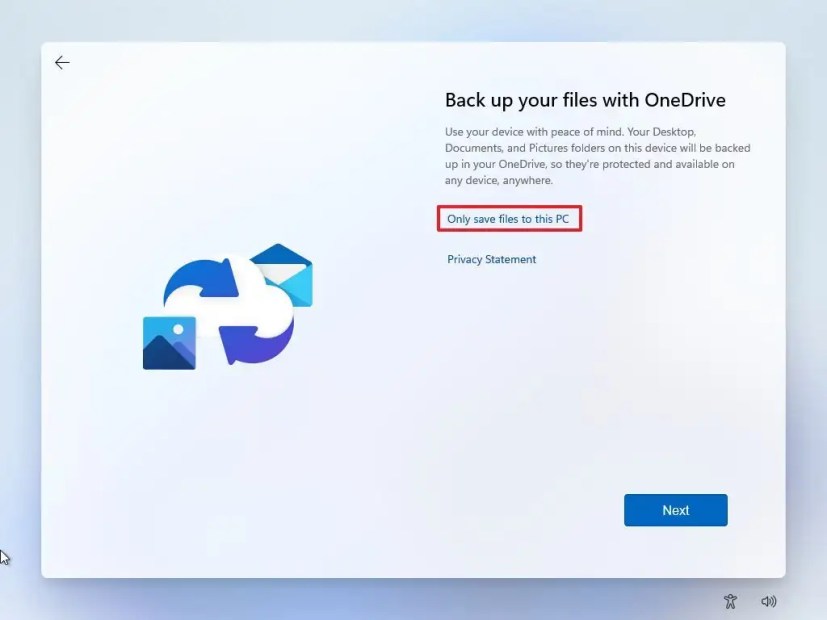
Click the “Next” button to automatically upload your Desktop, Pictures, and Documents folders to OneDrive. Or Select the “Only save files to this PC” option.
-
Click the Next button.
-
Click the Decline button to skip the Microsoft 365 setup.
-
Click the “Skip for now” button to skip the Game Pass subscription promotion.
Once you complete the steps, Windows 11 will install in an unsupported state, so you may not get security or driver updates.
Upgrade to Windows 11 on unsupported hardware from ISO file
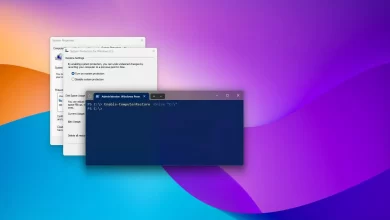
Alternatively, you can perform an in-place upgrade of Windows 11 with an ISO file on a device that doesn’t meet the system requirements. However, you must run a script to bypass the TPM, Secure Boot, and processor check.
1. Bypass Windows 11 requirement checks
To bypass the minimum system requirements to install Windows 11, use these steps:
-
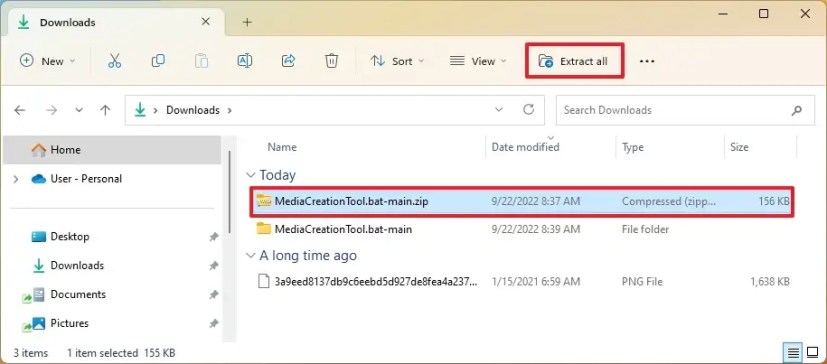
Click the Code button from the top-right corner and the Download Zip option.

-
Select the MediaCreationToo.bat-main folder and click the Extract all button.
-
Click the Browse button.
-
Select the extraction location and click the Select folder button.
-
Click the Extract button.
-
In the extracted folder, inside the MediaCreationToo.bat-main folder, open the bypass11 folder.
-
Right-click the “Skip_TPM_Check_on_Dynamic_Update.cmd” file and select the Run as administrator option.

-
Click the More info option.
-
Click the Run anyway button.
Once you complete the steps, you can mount an ISO file to begin the installation of Windows 11 on unsupported hardware (see steps below). If the script is not working, restart the computer and run it several times.
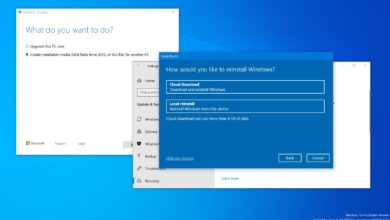
2. Upgrade to Windows 11 from ISO
To upgrade an incompatible computer to Windows 11 (version 22H2 or 21H2) with an ISO file, use these steps:
-
Under the “Download Windows 11 Disk Image (ISO)” section, select the Windows 11 option.
-
Click the Download button.
-
Select the installation language.
-
Click the Confirm button.
-
Click the Download button to save the Windows 11 ISO file on the device.
-
Right-click the ISO file, select the Open with submenu, and choose the Windows Explorer option.
-
Click on the mounted drive from the left navigation pane.
-
Double-click the Setup file to begin the Windows 11 upgrade process.
-
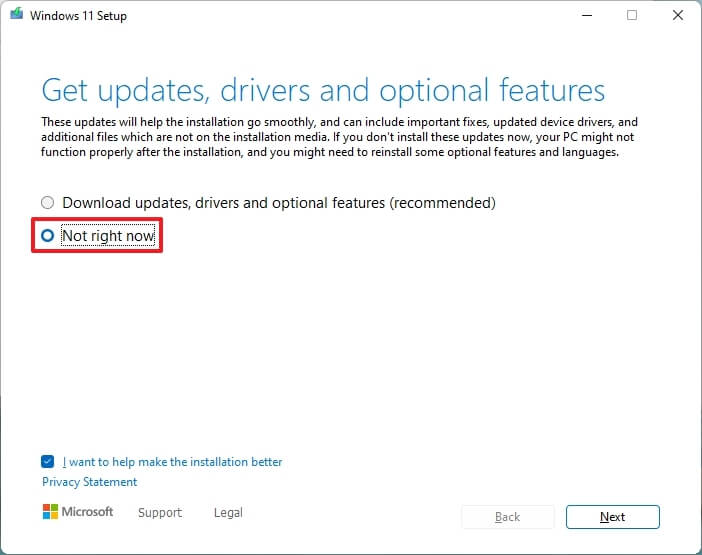
(Optional) Click the “Change how Windows Setup downloads updates” option.

-
Select the “Not right now” option.
-
Click the Next button.
-
Click the Install button to upgrade while keeping files and apps.
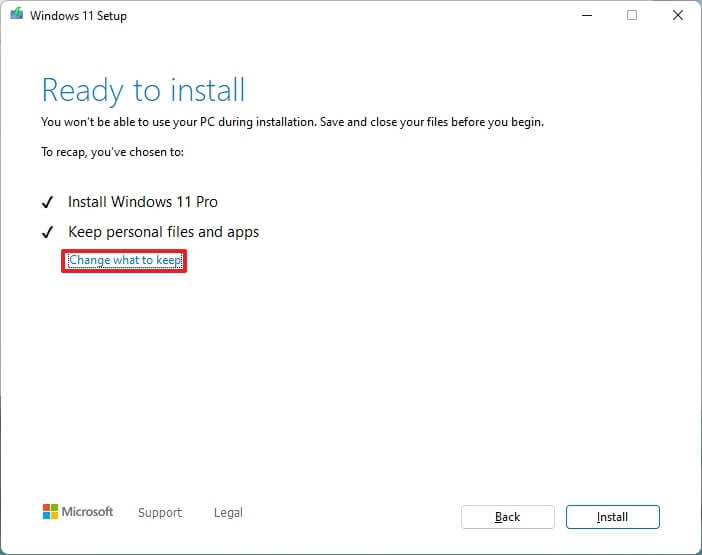
If you want to start fresh with a clean installation of Windows 11, click the “Change what to keep” option, select the “Nothing” option, click the Next button, and then click the “Install” button.
After you complete the steps, the setup will continue to upgrade the laptop or desktop computer to the Windows 11 2022 Update (version 22H2). However, Windows 11 will run in an unsupported state that won’t guarantee updates, nor will you receive support from Microsoft.
Upgrade to Windows 11 on unsupported hardware from Registry
Although it’s not supported, Microsoft has published a workaround to bypass the Windows 11 requirements to continue the setup by editing the Registry. However, the computer needs a TPM 1.2 chip and UEFI firmware with Secure Boot enabled. (These steps may or may not work on Windows 11 22H2.)
1. Edit Registry to bypass official checks
To bypass the minimum system requirements to upgrade to Windows 11 22H2, use these steps:
-
Open Start.
-
Search for regedit and click the top result to open the Registry Editor.
-
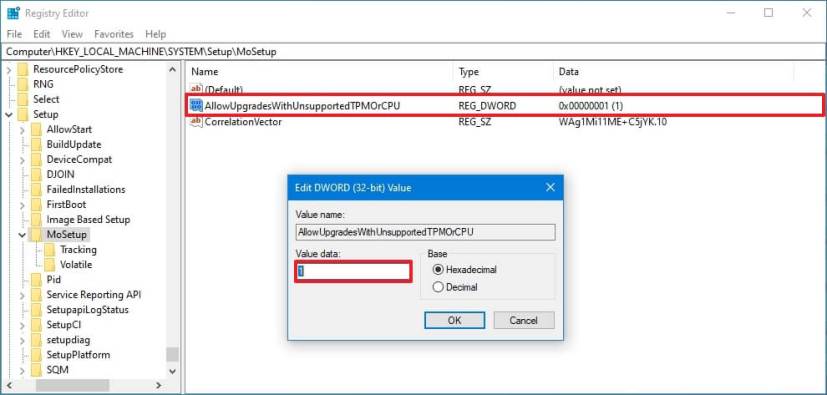
Navigate to the following path:
HKEY_LOCAL_MACHINE\SYSTEM\Setup\MoSetup
-
Right-click the MoSetup (folder) key, select the New submenu, and choose the “DWORD (32-bit) Value” option.
-
Name the key AllowUpgradesWithUnsupportedTPMOrCPU and press Enter.
-
Double-click the newly created key and set its value from 0 to 1.
Once you complete the steps, you can mount an ISO file or connect a USB media to begin the installation of Windows 11 on unsupported hardware.
2. Upgrade to Windows 11 using ISO file
To begin the Windows 11 upgrade process, use these steps:
-
Under the “Download Windows 11 Disk Image (ISO)” section, select the Windows 11 option.
-
Click the Download button.
-
Select the installation language.
-
Click the Confirm button.
-
Click the Download button to save the Windows 11 ISO file on the device.
-
Right-click the ISO file, select the Open with submenu, and choose the Windows Explorer option.
-
Click on the mounted drive from the left navigation pane.
-
Double-click the Setup file to begin the Windows 11 upgrade process.
-
(Optional) Click the “Change how Windows Setup downloads updates” option.
-
Select the “Not right now” option.
-
Click the Next button.
-
Click the Accept button to agree to the terms.

-
Click the Install button to upgrade while keeping your files and apps.
If you want to start fresh with a clean installation of Windows 11, click the “Change what to keep” option, select the “Nothing” option, click the “Next” button, and then click the “Install” button.
Once you complete the steps, the setup will continue upgrading the device to Windows 11.